Assignments > HW1. REST
Due on Thu, 01/28 11:59PM.
Background Readings
If you’re interested in learning more about the technologies we’re using, I’ve pasted some references below:
- Learn more about how to query MongoDB via the MongoEngine library.
- Learn more about deploying a web server to Heroku.
- Learn more about flask_restful (library for helping you create REST Endpoints).
The goals of this assignment are as follows:
- Getting you familiar with some ways of testing / interacting with REST APIs using Postman.
- Helping you create your own REST API Endpoint by implementing the GET, POST, PUT, and DELETE methods.
- Helping you deploy your web server on Heroku so that you can share your creations with the world.
I. Download and integrate the starter code
There are some new starter files this week that implement the GET, POST, PUT, and DELETE methods for the Post resource (to help you get started).
- Download the starter files.
- On the command line, navigate to your
cs330-web-serverfolder from last week. - Then, using your file browser, copy the
viewstestingapp.pyandmodels.pyfiles/folders from the zip file you just downloaded into your existingcs330-web-serverrepository. You may want to save the current version of your repo before doing this:git checkout -b 'lab01'git checkout master - On your command line, run your flask server. Recall, the steps are:
- export FLASK_APP=app.py
- export FLASK_ENV=development
- flask run
- In your web browser, navigate to: http://127.0.0.1:5000/api/posts/ and verify that the link works (you should see the posts you made last week).
II. Install Postman and test the endpoints for the “Post” resource
To test your REST client, install Postman (if you haven’t already). When you’re done, open it and use it to test the two endpoints for the “Post” resource.
- To test POST and GET (for getting all of the posts), you will use: http://127.0.0.1:5000/api/posts/
- To test PUT, DELETE, and GET (for a single post), you will use: http://127.0.0.1:5000/api/posts/
(but replace with a valid Post id).
Screenshots below:
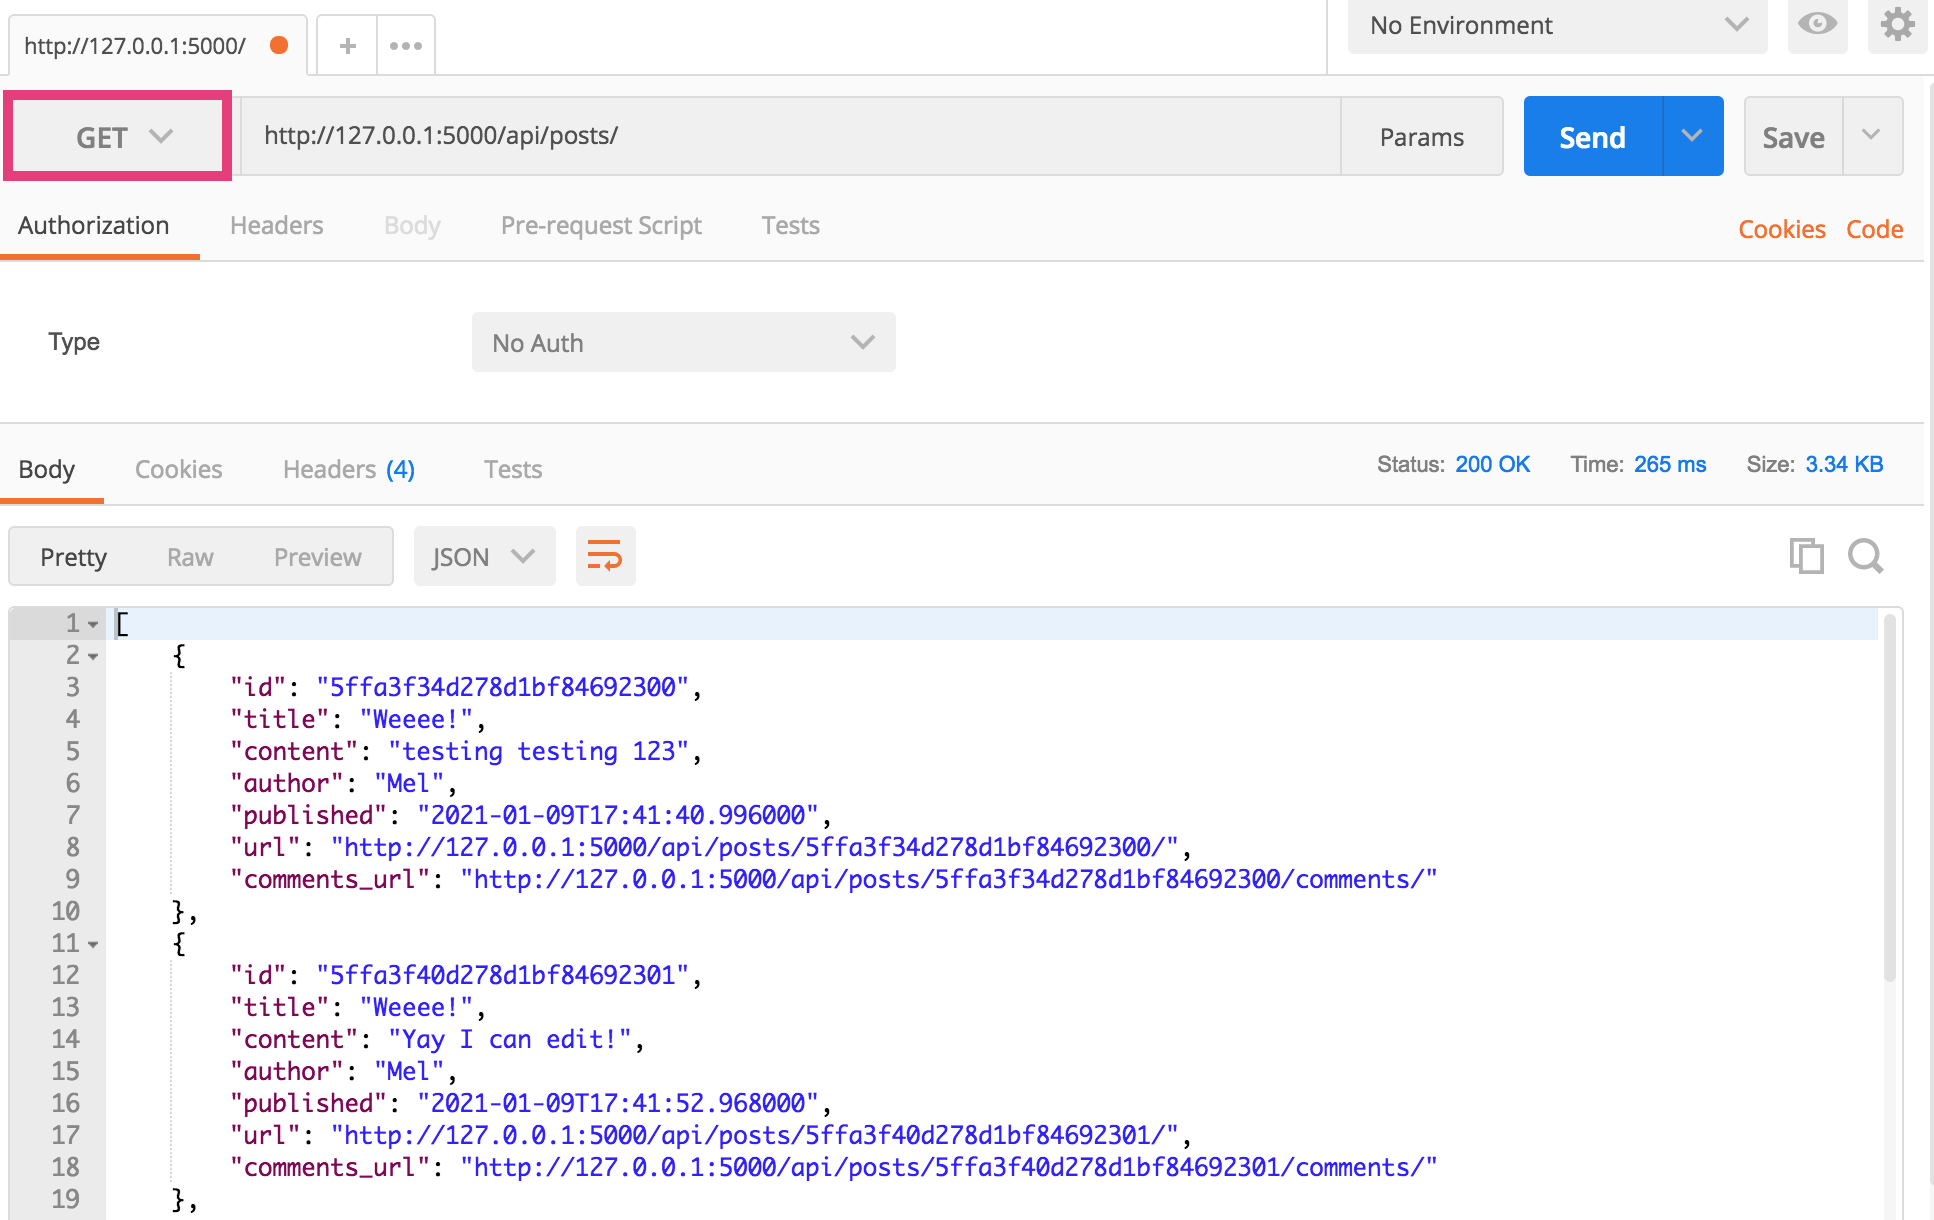
1. GET (List Version)
- Paste http://127.0.0.1:5000/api/posts/ into the address bar
- Ensure that the GET method is selected
- Click the “Send” button.
If it worked, you will see data output in the panel below.
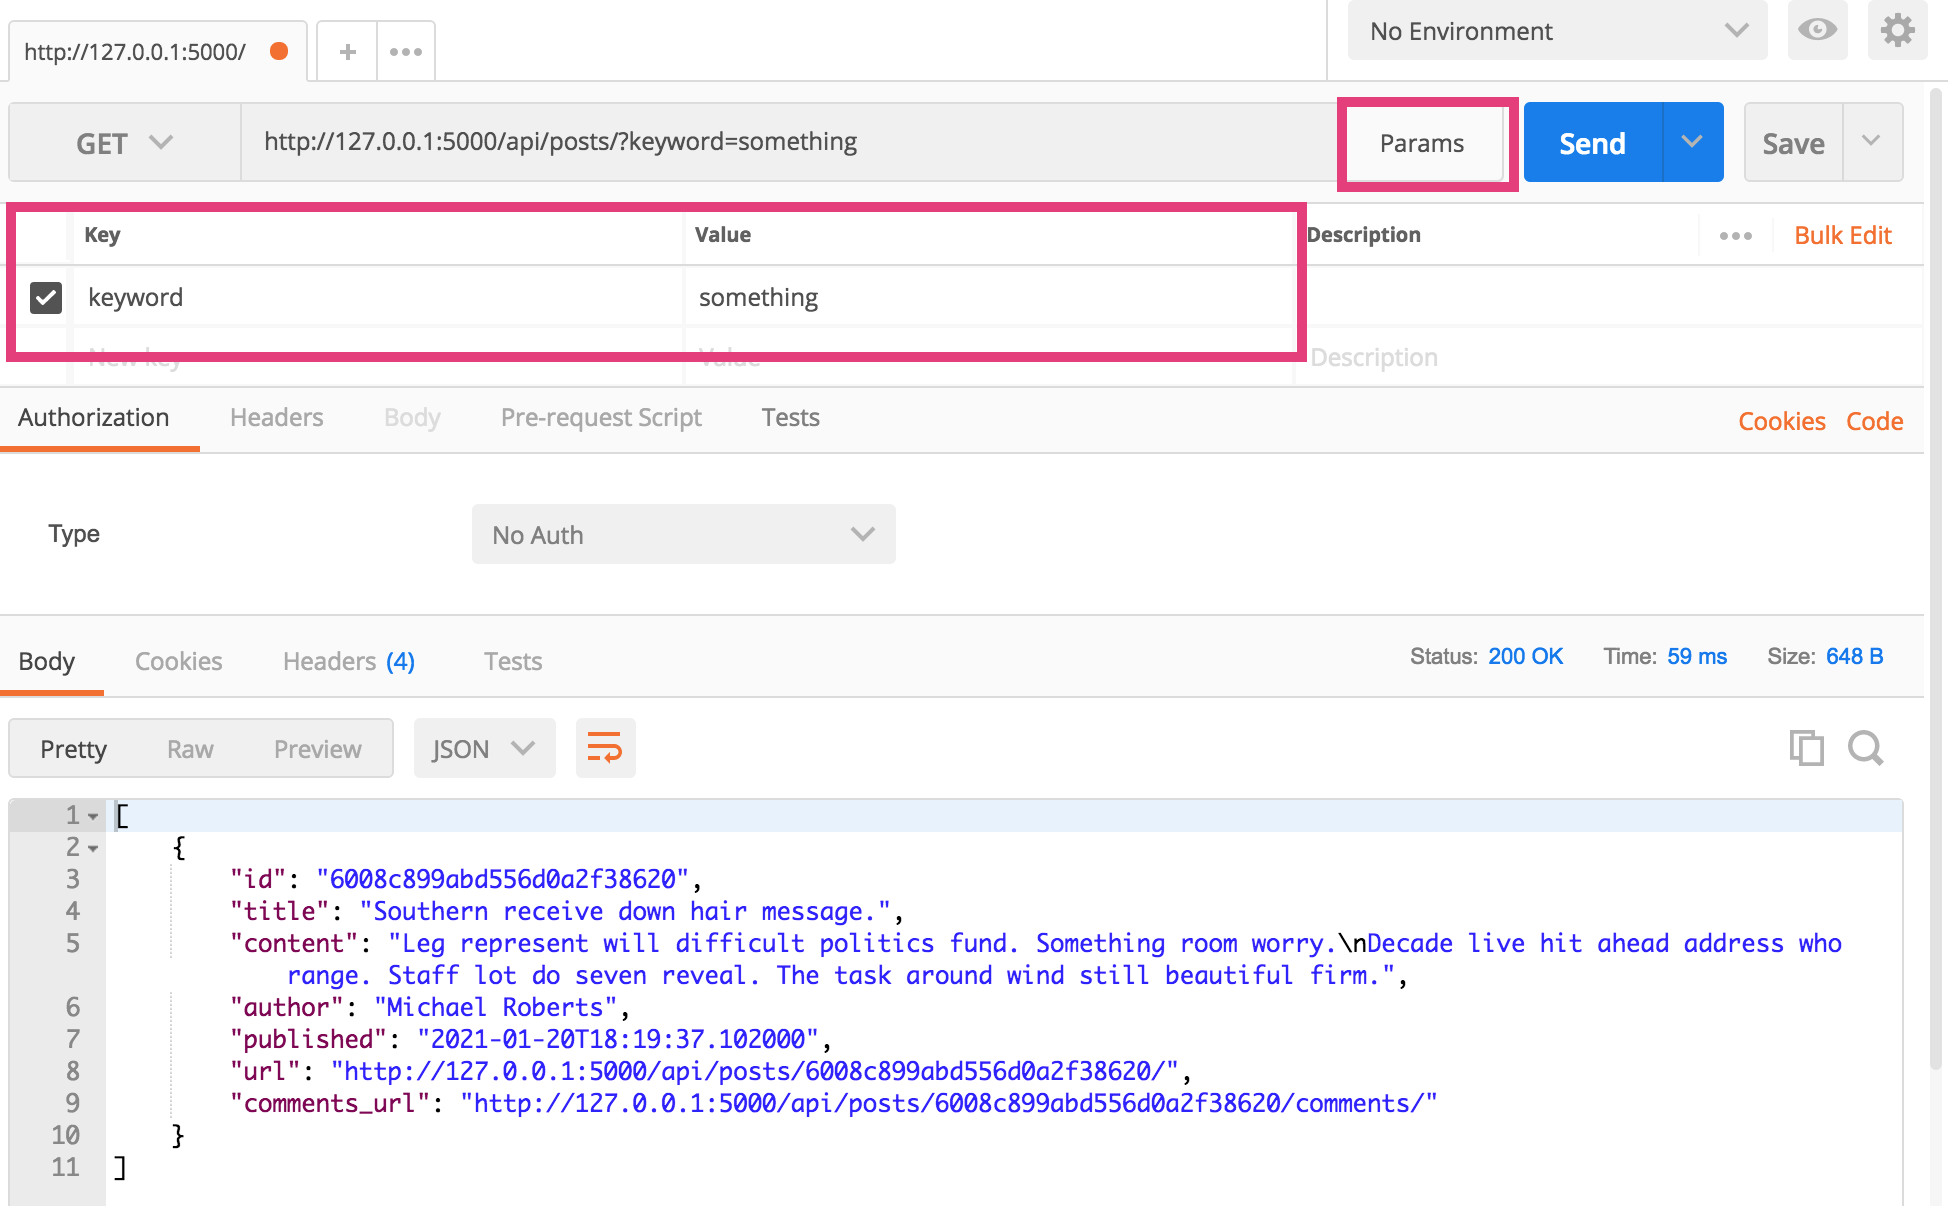
To filter by keyword, click the “params” button and add a parameter named “keyword” with a corresponding search term:
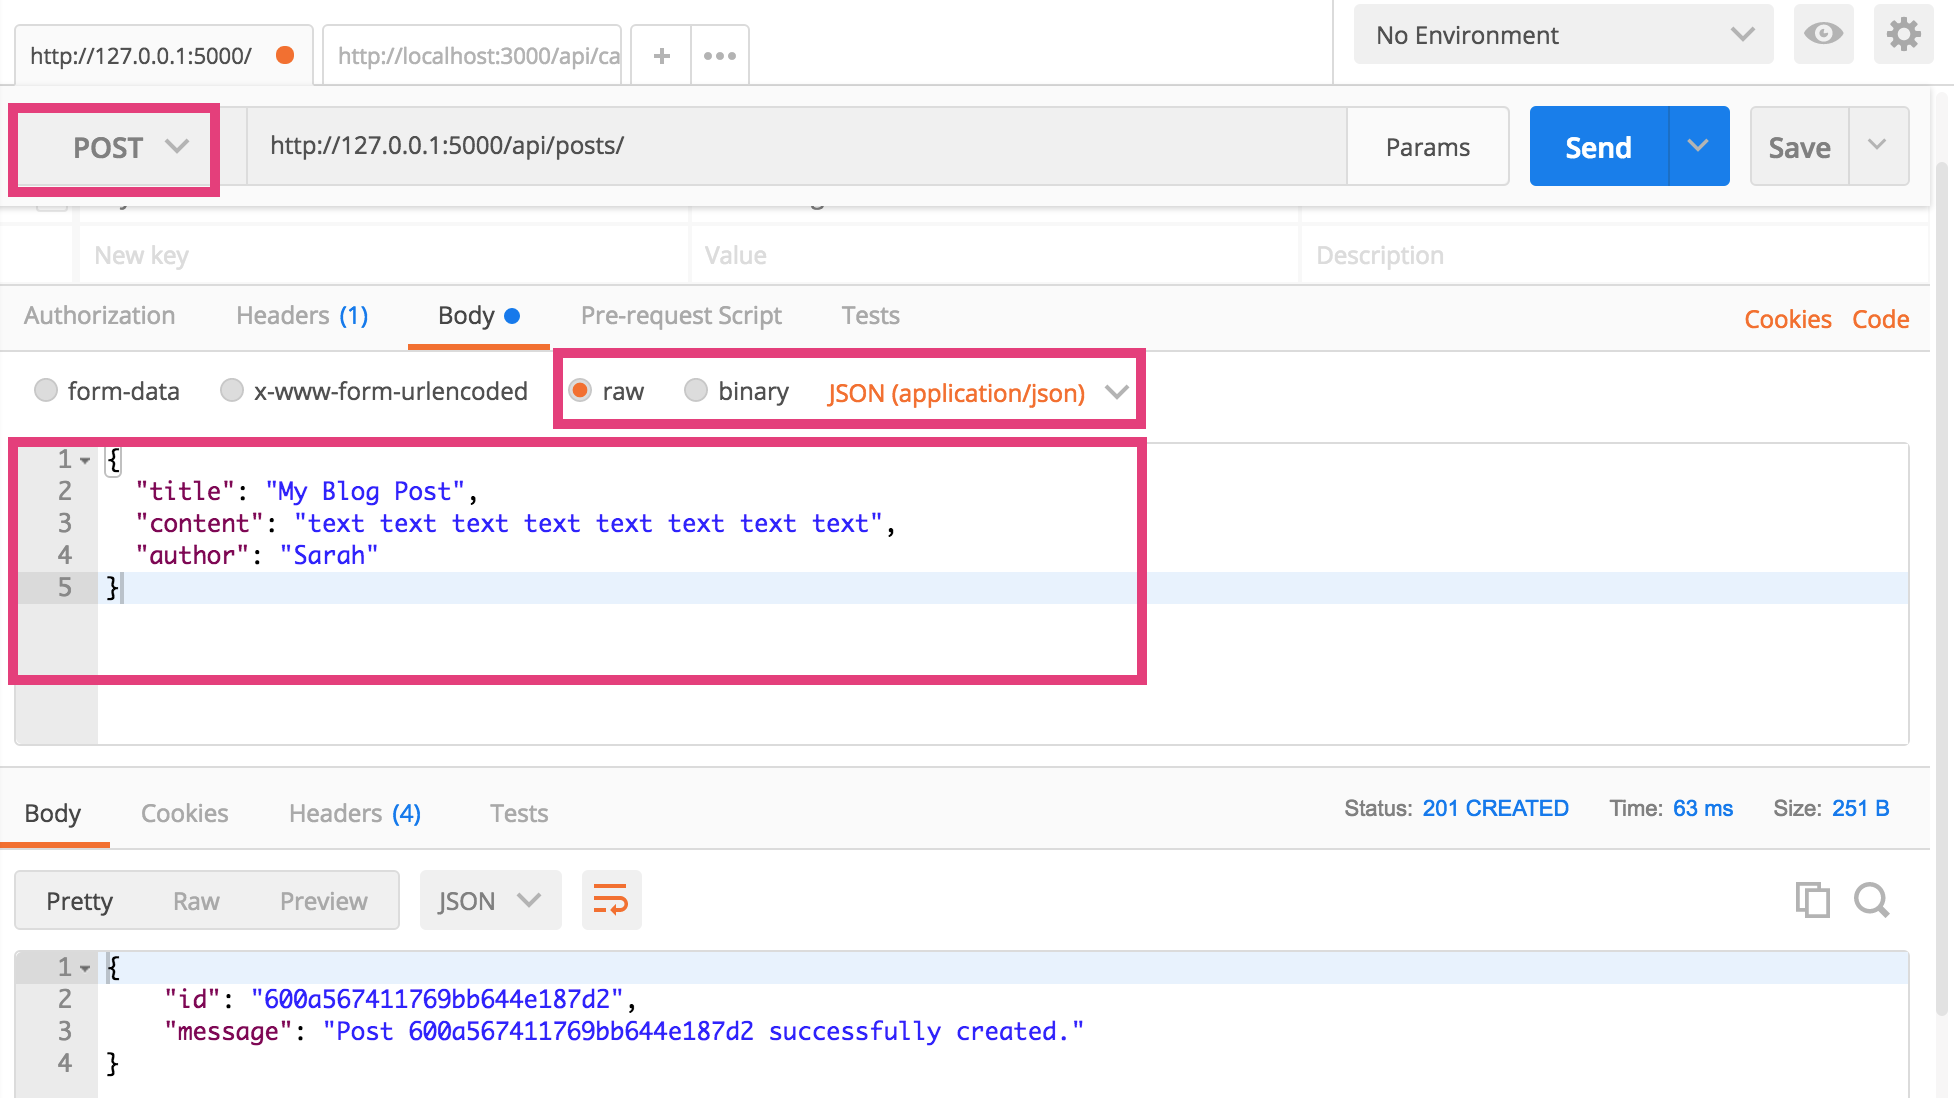
2. POST
You can also create new Post resources using the http://127.0.0.1:5000/api/posts/ endpoints. To do this:
- Open a new Postman Tab (similar to a browser tab)
- Select the POST method
- Click on the “body” tab and select the “raw” option
- Make sure the data type selected is JSON (application/json)
- Create a JSON representation of the Post (be sure to include the title, content, and author).
- Click send (you should get a success message).
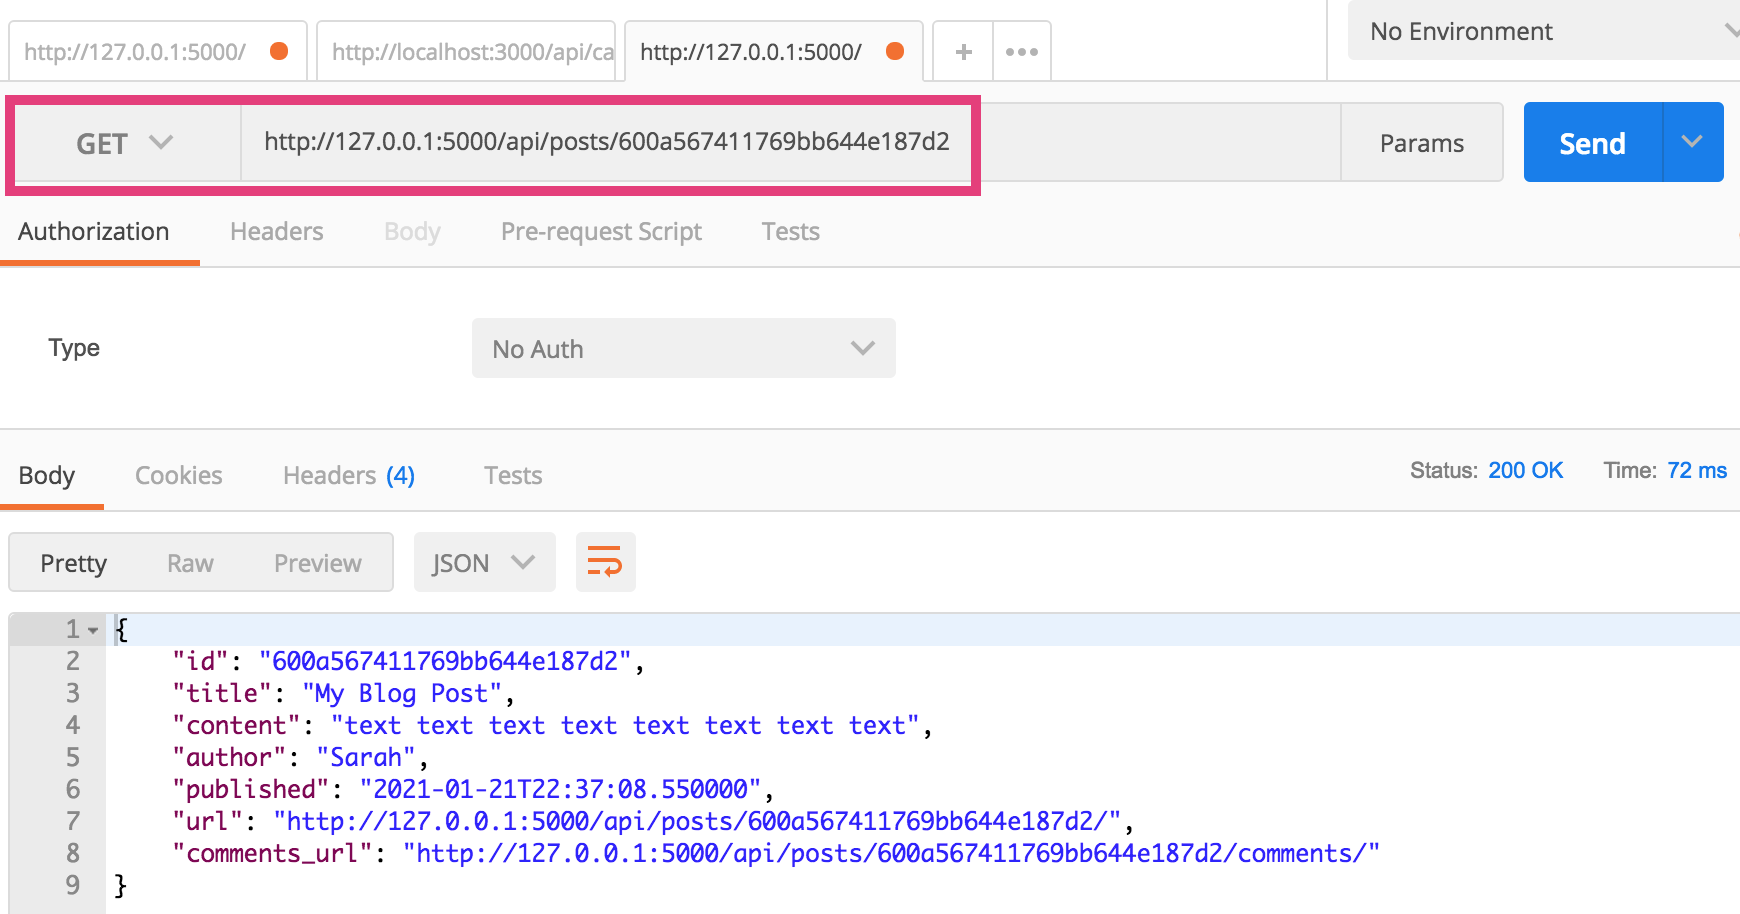
3. GET (Detail Version)
To get a single Post resource…
- Open a new tab
- Paste in an endpoing for a specific Post (e.g. http://127.0.0.1:5000/api/posts/600a567411769bb644e187d2 - yours will be different).
- Click “Send”
If it worked, you will see the resource output in the panel below (see screenshot).
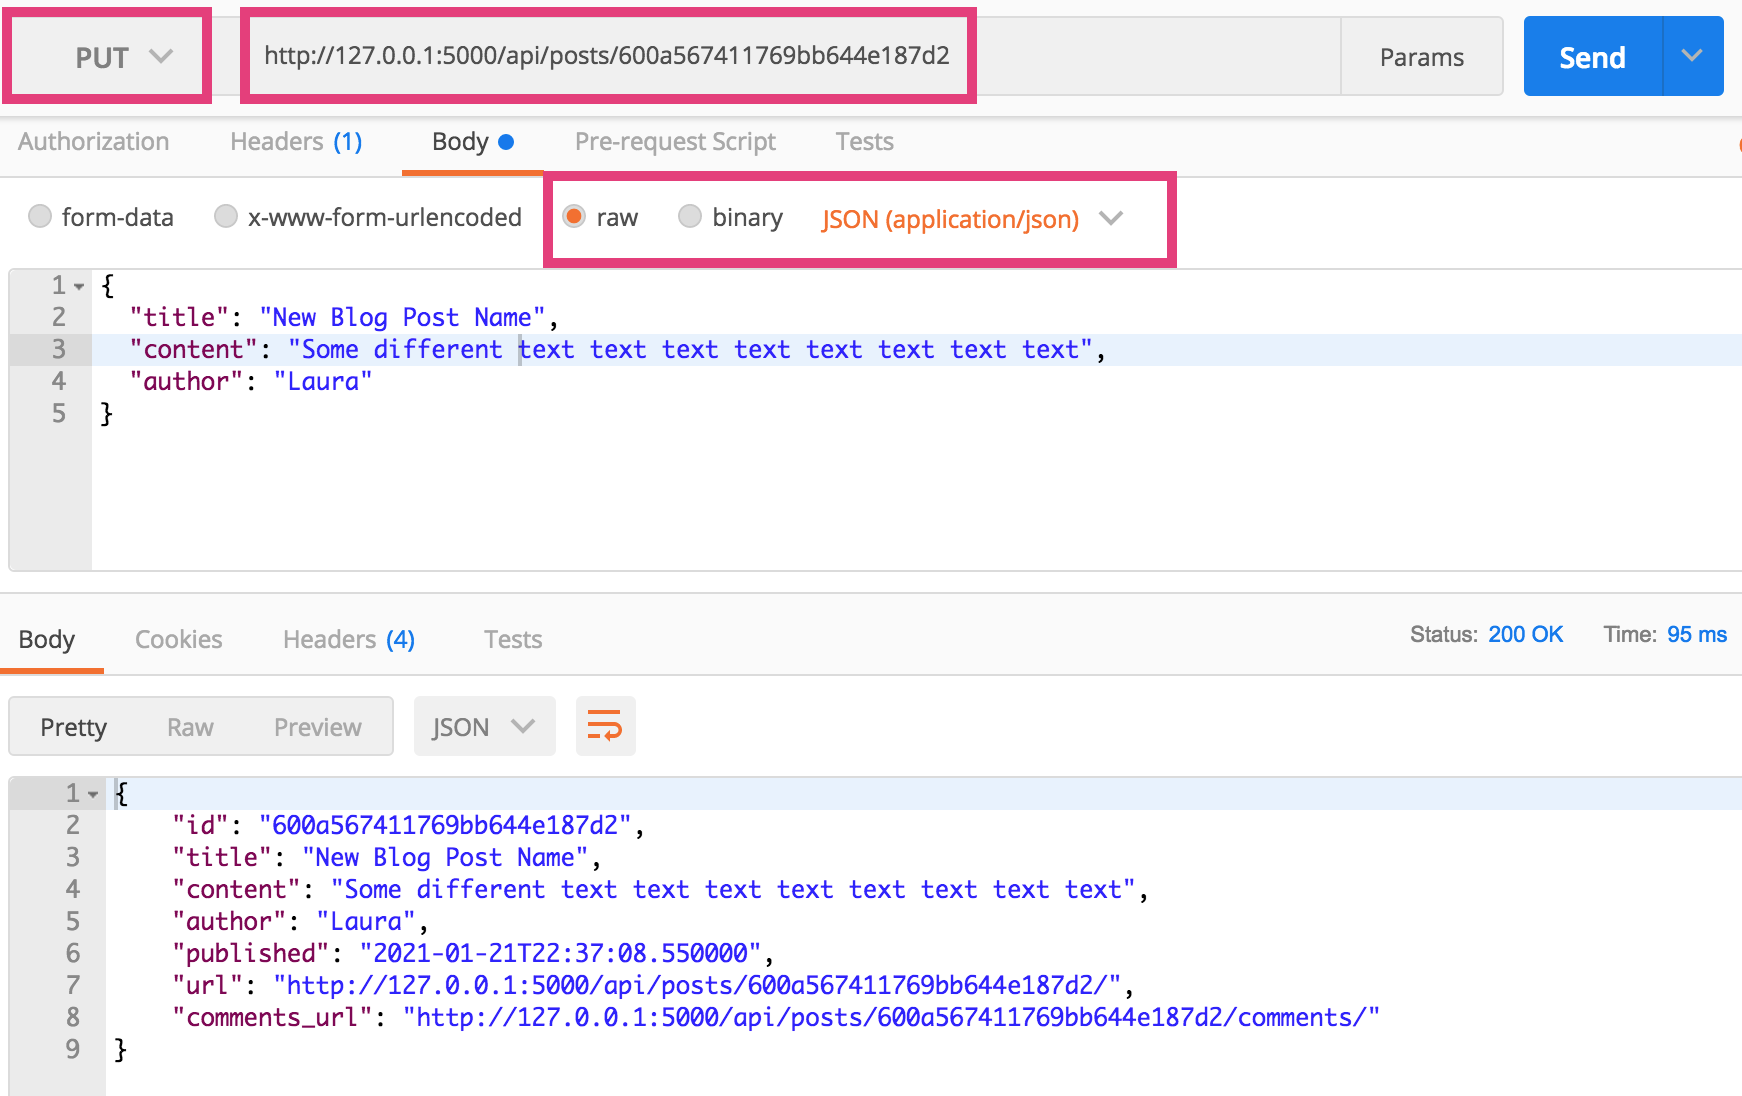
4. PUT
To update the resource:
- Open a new Postman tab
- Use the same endpoint as in #3
- Select the PUT method
- Click on the “body” tab and select the “raw” option
- Make sure the data type selected is JSON (application/json)
- Create a updated Post JSON representation.
- Click send (you should get a success message).
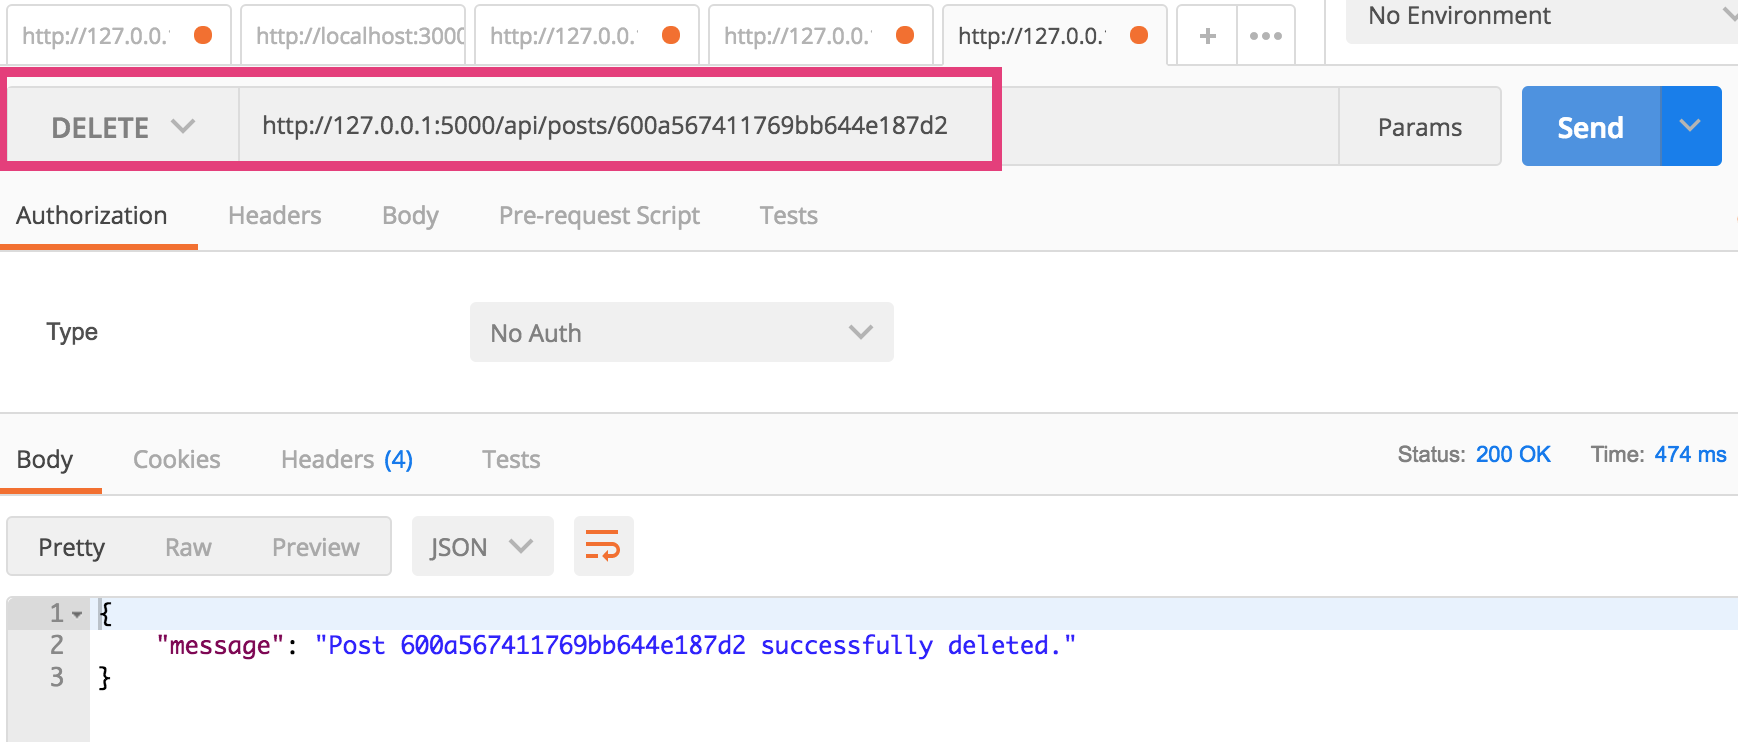
5. DELETE
To delete the resource:
- Open a new Postman tab
- Use the same endpoint as in #3
- Select the DELETE method
- Click send (you should get a success message).
Nice work! You now know how to test a REST API using the GET, PUT, POST, and DELETE methods.
III. Creating a New REST Endpoint
For your homework, you will create REST endpoints for the Comment resource (so that your app will ultimately be able to support blogging and commenting). This will require you to edit the views/comments.py to implement:
- An endpoint for GET (list of resources) and POST.
- An endpoing for GET (single resource), PUT, and DELETE.
When you’re done, you should be able to create, read, update, and delete new comments associated with a particular blog.
Some tips
- In this week’s version of the files, all of the endpoints have been organized using the flask_restful library. Take a look at
views/posts.pyto see how each endpoint has been organized. I have also created a stub for you calledviews/comments.py(code copied inline below). Feel free to useviews/posts.pyas a guide to help you.
class CommentListEndpoint(Resource):

    def get(self):
        # TODO: implement GET endpoint
        return Response(json.dumps([]), mimetype="application/json", status=200)

    def post(self):
        # TODO: implement POST endpoint
        return Response(json.dumps([]), mimetype="application/json", status=201)

class CommentDetailEndpoint(Resource):
    def put(self, id):
        # TODO: implement PUT endpoint
        return Response(json.dumps([]), mimetype="application/json", status=200)

    def delete(self, id):
        # TODO: implement DELETE endpoint
        return Response(json.dumps([]), mimetype="application/json", status=200)

    def get(self, id):
        # TODO: implement GET endpoint
        return Response(json.dumps([]), mimetype="application/json", status=200)

def initialize_routes(api):
    api.add_resource(CommentListEndpoint, '/api/comments', '/api/comments/')
    api.add_resource(CommentDetailEndpoint, '/api/comments/<id>', '/api/comments/<id>/')
If you’re new to this kind of programming, it can be a real drag to get the various components to connect together (views, routes, models, database, etc.). Please come to Office Hours if you get hung up on anything. Nothing is too difficult conceptually, but the logistics can be a little tedious.
IV. Publishing your web server to Heroku
Set up your Heroku App on the Heroku Website
- Register for Heroku (if you don’t yet have an account): https://signup.heroku.com/.
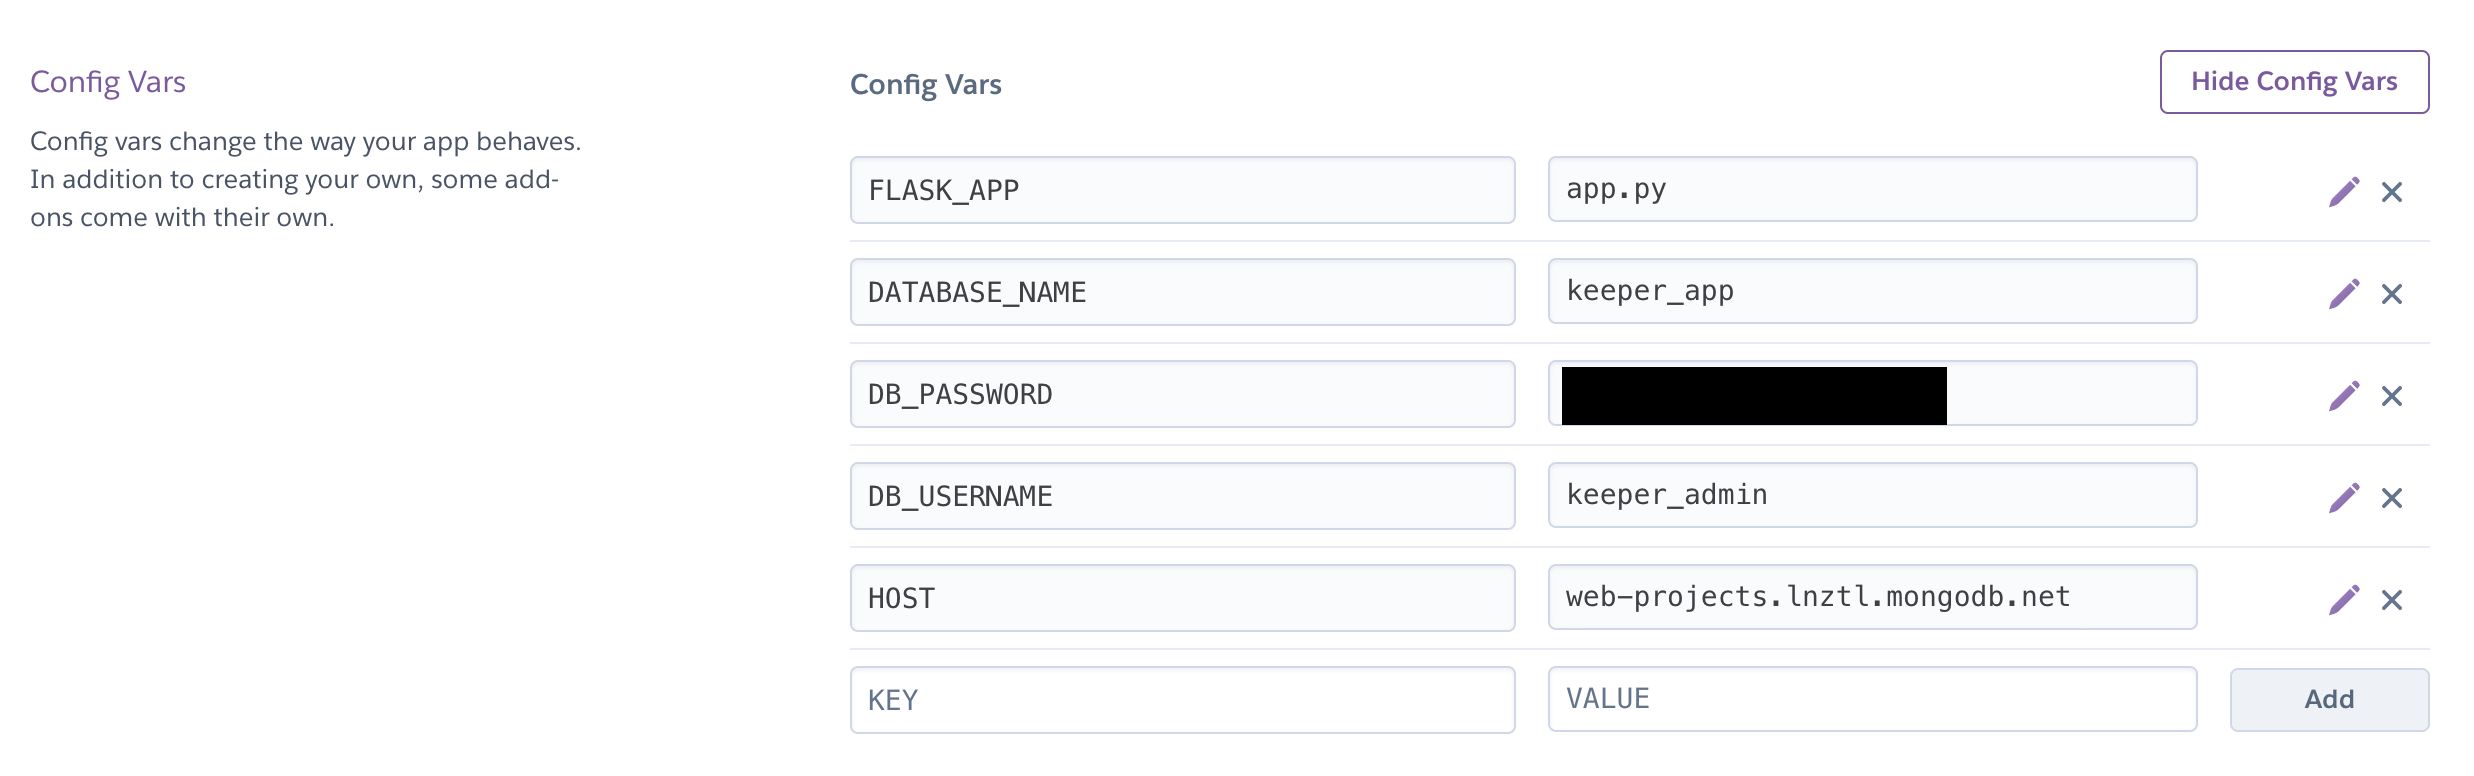
- Create a new app on Heroku by logging into the Heroku website and using the Web UI.
- Navigate to the settings tab of the app you just made, and add your database environment variables (exactly as they are in the .env file). See screenshot below. My variable names may be slightly different than yours.
Publish your app using the command line interface
- Download and install the Heroku CLI for your OS.
- Log into your Heroku account using the command line interface (CLI):
heroku login -i - Navigate to your
cs330-web-serverfolder (using the command line) - Connect your local git repo to your newly created Heroku app:
heroku git:remote -a 'name-of-the-app-you-just-made' - Push your repo to Heroku:
git push heroku master - Test your web server
- Push your repo to GitHub
git push origin master
Tips
- If you ever want to redeploy to Heroku without actually changing any files, pushing an empty commit to Heroku:
git commit --allow-empty -m "empty commit"
git push heroku master
- If you need to debug your Heroku deployment, you can view the error logs as follows:
heroku logs --tail
What to Submit
Please paste the following links into Canvas:
- A link to your GitHub repo
- A link to your live Heroku server